Blockchain Programming Part 2: Our Blockchain as an API
In this section, we will be discussing how we can use our Blockchain as an API, this post is the continuation of the Blockchain Programming series which is a detailed and practical hands-on guide to build your very own Blockchain.
Step 2: Our Blockchain as an API
We’re going to use the Python Flask Framework. It’s a micro-framework and it makes it easy to map endpoints to Python functions. This allows us talk to our blockchain over the web using HTTP requests.
We’ll create three methods:
/transactions/newto create a new transaction to a block/mineto tell our server to mine a new block./chainto return the full Blockchain.
Setting up Flask
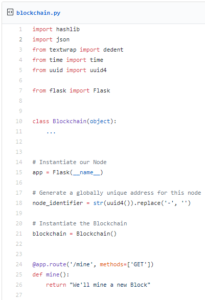
Our “server” will form a single node in our blockchain network. Let’s create some boilerplate code:
A brief explanation of what we’ve added above:
- Line 15: Instantiates our Node. Read more about Flask here.
- Line 18: Create a random name for our node.
- Line 21: Instantiate our
Blockchainclass. - Line 24–26: Create the
/mineendpoint, which is aGETrequest. - Line 28–30: Create the
/transactions/newendpoint, which is aPOSTrequest, since we’ll be sending data to it. - Line 32–38: Create the
/chainendpoint, which returns the full Blockchain. - Line 40–41: Runs the server on port 5000.
Also Read: Blockchain Programming Part 1: ‘Building A Blockchain’
The Transactions Endpoint
This is what the request for a transaction will look like. It’s what the user sends to the server:
{
 "sender": "my address",
 "recipient": "someone else's address",
 "amount": 5
}
Since we already have our class method for adding transactions to a block, the rest is easy. Let’s write the function for adding transactions:
Also Read: Blockchain Programming Part 3: Interacting with our Blockchain using Postman
The Mining Endpoint
Our mining endpoint is where the magic happens, and it’s easy. It has to do three things:
- Calculate the Proof of Work
- Reward the miner (us) by adding a transaction granting us 1 coin
- Forge the new Block by adding it to the chain
Note that the recipient of the mined block is the address of our node. And most of what we’ve done here is just interact with the methods on our Blockchain class. At this point, we’re done, and can start interacting with our blockchain.
Also Read: Blockchain Programming Part 4: Consensus
Featured Photo by Nate Grant on Unsplash
Disclaimer: The opinions presented here are of the Authors. Readers should do their own due diligence before taking any actions related to the promoted company or any of its affiliates or services. CoinScenario.com is not responsible, directly or indirectly, for any damage or loss caused or alleged to be caused by or in connection with the use of or reliance on any content, goods or services mentioned in the press release.
Here is a list of Contributors on Coin Scenario. If you wish to submit a Press Release, please Click Here. If you wish to Advertise with us, please Click Here.


