

Build your First Smart Contract: Deploying Smart Contract using Truffle
Welcome to the second part of building your First Smart Contract, sounds rhetorical! But anyways, hope the first part helped you getting familiar with the terminologies associated and the tools required for building Smart Contracts. This article will be about how you can build and deploy your Smart Contract first on Testnet and then on the Mainnet using Truffle.
Create an initial project
After the previous step, you should install all the basic environment. Then, we can start us hello world. Create a folder first and initialize the Truffle into the folder.
mkdir solidityTest
cd solidityTest
truffle init
After project initialized, the folder would have 3 folders and 1 js file. They should
- contracts/ Store your solidity contracts.
- migrations/ Place scriptable deployment files.
- test/ Save your test files here for testing your dapp and contracts.
- truffle.js Main Truffle configuration file.
And you would find some contracts already exist in; additionally, the truffle init gives you a set of example contract which act like a simple alt-coin built on top of Ethereum. I will use this example contract to compile and execute.
Create your contract
You can create your contract through truffle. Go to you directory where you want to store your code, and then run:
truffle create contract MyContract
to create your contract. Also, you can use the following codes to create a migration file:
truffle create migration MyMigration
It also support creating test:
truffle create test MyTest
Remember, name must be camel-case.
But now, we use the samples which truffle provides us to do the coming steps. If you want to know the detail about how to write smart program in Solidity, you can see here.
Also Read: Build your First Smart Contract: Introduction to Ethereum Blockchain Programming
Compile contracts
Truffle expects to find solidity contracts in ./contracts directory. After you initialize Truffle to the folder, there are three .sol files, Migrations.sol, MetaCoin.sol and ConvertLib.sol. If you want to write your program, you can delete MetaCoin.sol and ConvertLib.sol. Truffle expects your contract files to define contracts that match their filenames exactly.
To compile your contracts in your directory, you can type
truffle compile
It will compile the contract that has been changed since the last compile. If you want to compile all the code, you can use:
truffle compile -all
After you compile your contracts, Truffle will create .json files in ./build/contracts. These artifacts are integral to the inner workings of Truffle. You should not edit these files by hand as they’ll be overwritten by contract compilation and deployment.
Run migrations
Migrations are a set of managed deployment scripts to help you deploy contracts to the Ethereum network. They are stored in ./migrations. They’re written under the assumption that your deployment needs will change over time.
The migration files look like that when you $ truffle init, But you can edit the file as you want.:
//1_initial_migration.js
var Migrations = artifacts.require("./Migration.sol");
module.exports = function(deployer){
deployer.deploy(Migrations);
};
For local testing make sure to have TestRPC installed and running before running migrate, and use the following command:
truffle migrate
You can use the --reset option to run all your migrations from the beginning.
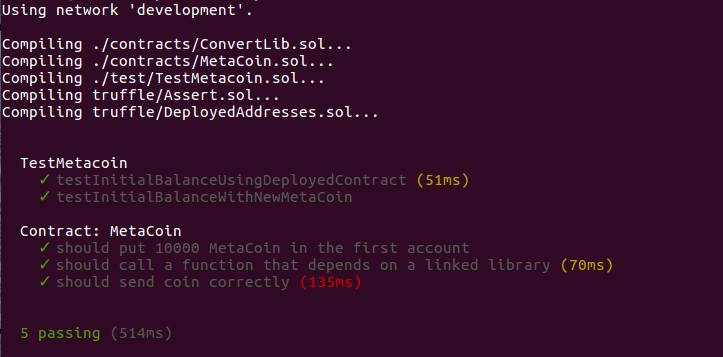
Test your smart contract through truffle
Before you publish your smart contract, you should test your contract. Truffle provides an automated testing framework which allows you to write your test in JavaScript or Solidity.
$ truffle init creates two test samples (1 JavaScript, 1 Solidity) in the ./test directory. You can use the following code to run all test:
truffle test
If success, it would show the processing time and passing status.
Deploy your code on the real network
a. Open Geth console
After you test your contract through and detailed, you can try it on real network. I will use Geth as clients to run the contract. Geth provides a Morden (testnet) mode, which is identical to real network except it would not risk your real money. To start the Morden console you can use:
geth --identity "MyTestNode" --rpc --datadir "/home/chunwei/dev/testchain" --port "30303" --nodiscover --rpcapi "db,eth,net,web3" console
Rest of this part illustrates command line parameters. You can pass these part to next step.
--identity "MyTestNode"
This will set up an identity for your node so it can be identified more easily in a list of peers.
--rpc
This will enable RPC interface on your node. This is generally enabled by default in Geth.
--datadir "/home/chunwei/dev/testchain"
This is the data directory that your private chain data will be stored in. Note: Choose a location that is separate from your public Ethereum chain folder.
--port "30303"
This is the “network listening port”, which you will use to connect with other peers manually.
--nodiscover
Use this to make sure that your node is not discoverable by people who do not manually add you. Otherwise, there is a chance that your node may be inadvertently added to a stranger’s blockchain if they have the same genesis file and network id.
--rpcapi "db,eth,net,web3"
This dictates what APIs that are allowed to be accessed over RPC. By default, Geth enables the web3 interface over RPC.
b. Create an account and create the first node
After you open the Javascript console, you can create an account through the JavaScript console.
>personal.newAccount("your_passphrase")
Then, you can create a new genesis block and give the money to the account address. (In my example, my address is 0x0cb95f56816290b8ef07c0e5bac6d2caff3d34f4 and 0xd4ca556f4f294a7cf0f10e473a3663834a418fda)
CustomGenesis.json
{
    "nonce": "0x0000000000000042",     "timestamp": "0x0",
    "parentHash": "0x0000000000000000000000000000000000000000000000000000000000000000",
    "extraData": "0x0",     "gasLimit": "0x8000000",     "difficulty": "0x400",
    "mixhash": "0x0000000000000000000000000000000000000000000000000000000000000000",
    "coinbase": "0x3333333333333333333333333333333333333333",
    "alloc": {
     "0x0cb95f56816290b8ef07c0e5bac6d2caff3d34f4": { "balance" : "20000000000000000000000"},
     "0xd4ca556f4f294a7cf0f10e473a3663834a418fda": { "balance" : "1"}
    }
}
Then, initial a new block use:
geth — identity “MyTestNode” — rpc — datadir “/home/chunwei/dev/testchain” — port “30303” — nodiscover — rpcapi “db,eth,net,web3” — networkid 1999 init /home/chunwei/dev/CustomGenesis.json
Go back to the JavaScript console, you can find your address hold 20000 ethers. Meanwhile, unlock your accounts
>web3.fromWei(eth,getBalance(eth.accounts[0]),"ether");
20000
>personal.unlockAccount(eth.accounts[0],"your_passphrase", 24*3600)
true
c. Start migrating and deploying
Now we can migrate our contract to the Morden network. Open another terminal.
truffle migrate --reset
When you migrate your contract, you should start your miner in the Javascript console. Once it finishes migration, you can interact with your contract.
If you want to know more detail about how truffle process, you can see the Truffle official website.
Photo by Jefferson Santos on Unsplash
Disclaimer: The opinions presented here are of the Authors. Readers should do their own due diligence before taking any actions related to the promoted company or any of its affiliates or services. CoinScenario.com is not responsible, directly or indirectly, for any damage or loss caused or alleged to be caused by or in connection with the use of or reliance on any content, goods or services mentioned in the press release.
Here is a list of Contributors on Coin Scenario. If you wish to submit a Press Release, please Click Here. If you wish to Advertise with us, please Click Here.